Deploying microVM on Top of Kubernetes
In this tutorial, we will deploy a microVM on top of Kubernetes. We will use the Kata Containers runtime to run the microVM. The microVM will be deployed as a pod in Kubernetes.
If you are unfamiliar with microVM, I’ve recently written a Medium article about it. You can read it to get more information about microVM, Firecracker, and how you can deploy it from scratch.
If you are unfamiliar with Kubernetes, you can read the Kubernetes documentation here.
You may now wonder why you should use microVMs instead of containers. The answer is simple: microVMs are more secure than containers, as they give a hardware virtualization layer. This means that microVMs will be isolated from the host, which is not the case for containers. This is why microVMs are more secure than containers and are used by companies like AWS, Google, etc., to run their serverless services.
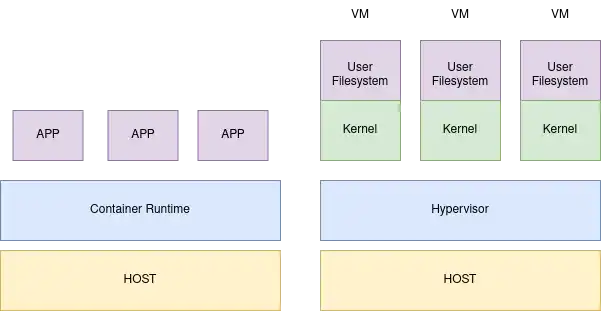
The following diagram explains the difference between containers and microVMs:

Container VS VM — Architectural diagram
Before we start, let’s see the prerequisites.
Prerequisites
-
A Kubernetes cluster with at least one node. Yes, it is quite obvious, but who knows? :)
-
KVM is installed on the node. You can check if it is installed by running the following command:
$ lsmod | grep kvm
If you don’t see any output, you need to install KVM. You can find the installation instructions here.
Some Challenges
Before we start, let’s see the challenges we need to solve to deploy a microVM on top of Kubernetes.
PID 1
PID 1 is the first process (init process) executed when the microVM starts. This process is responsible for initializing the microVM.
In the case of a container, there is no init process because the container is not a real operating system. The container is just a process running on the host operating system.
We need to have an init process to ship our container as a microVM.
Expose a Container Runtime Interface to make the microVM compatible with Kubernetes
The Container Runtime Interface (CRI) is the standard interface used by the kubelet to manage the containers. It is a set of gRPC primitives that the kubelet uses to interact with the container runtime. Thanks to the CRI, the kubelet can create, start, stop, delete, etc., the containers without knowing the implementation details of the container runtime.
Without the CRI, the kubelet cannot manage the microVM. So, we need to expose a CRI to the kubelet to make the microVM compatible with Kubernetes.
Unfortunately, Virtual Machine Manager (VMM) does not expose a CRI. So, we need to implement a shim that will expose a CRI to the kubelet. This shim will be responsible for the communication between the kubelet and the VMM.
If you want to know more about the CRI, you can read the Kubernetes documentation
Pause container
The pause container is used to hold the network namespace of the pod. It keeps the network namespace alive until the pod is deleted. The pause container is created by the kubelet and is not managed by the CRI but holds the resources of the pod.
If the pause container holds resources and the microVM doesn’t support hot plug, the microVM will start with the resources held by the pause container. This is not what we want.
We want the microVM to be able to support pod resource resizing.
If you want to know more about the pause container, you can read this excellent article.
Kata Containers
One solution to solve the challenges mentioned above is to use Kata Containers. Kata Containers is a container runtime that is compatible with Kubernetes. It is designed to run untrusted workloads on top of Kubernetes. It is compatible with Virtual Machine Managers (VMM) like QEMU, Firecracker, etc.
If you want to know more about it, just click here.
Kata Containers architecture
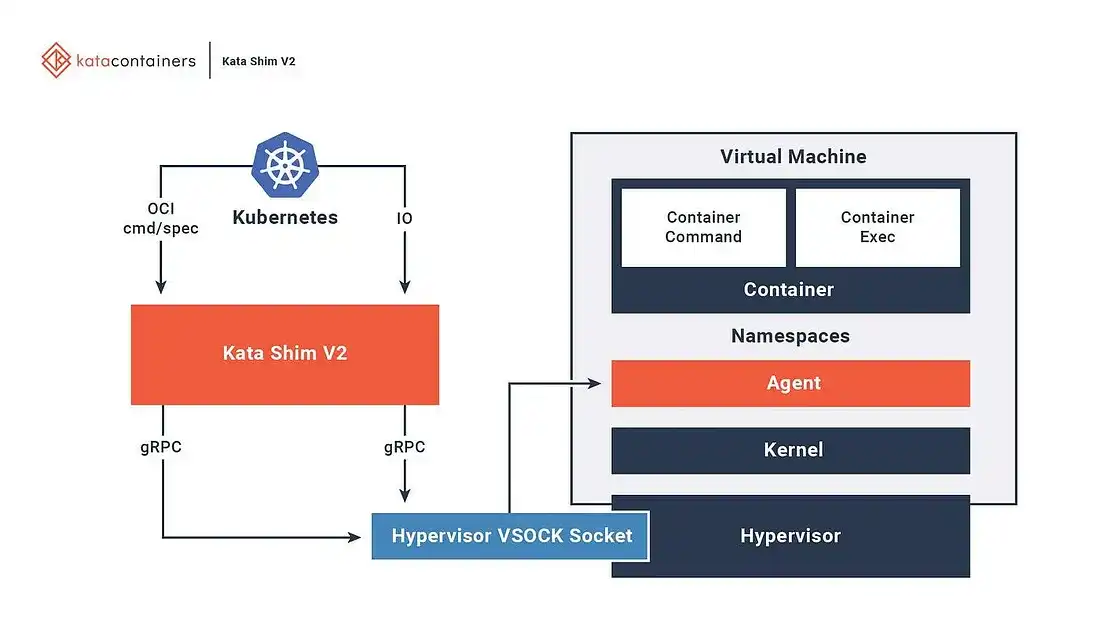
The following diagram shows the architecture of Kata Containers:

As you can see, Kata containers genuinely leverage the already-built container ecosystem.
First, Kata containers act as a shim between the kubelet and the VMM: They are responsible for the communication between them. It uses the containerd plugin architecture to expose a CRI to the kubelet.
Second, Kata containers own its own filesystem, where an agent runs. This agent is like a PID 1. It is responsible for the initialization of the microVM and for starting the container workload into the microVM using runC.
Third, Kata containers manage the agent through a VSOCK exposed by the microVM to the host. This VSOCK is used to communicate with the agent. The agent is responsible for communicating between the microVM and the container workload.
Finally, Kata containers can manage the microVM through different VMMs like QEMU, Firecracker, etc. Some of them support hot plug, which means the microVM can be resized without restarting it.
Thanks to Kata Containers, we can deploy a microVM on top of Kubernetes without trouble due to the abovementioned challenges.
Deploying a microVM on Top of Kubernetes
In this section, we will deploy a microVM on top of Kubernetes. We will use the Kata Containers runtime to run the microVM, and the microVM will be deployed as a pod in Kubernetes.
Installing Kata Containers
First, we need to install Kata Containers. You can find the installation instructions here.
If you are using a Vanilla Kubernetes Cluster, you can install Kata Containers by running the following commands:
$ kubectl apply -f https://raw.githubusercontent.com/kata-containers/kata-containers/main/tools/packaging/kata-deploy/kata-rbac/base/kata-rbac.yaml
$ kubectl apply -f https://raw.githubusercontent.com/kata-containers/kata-containers/main/tools/packaging/kata-deploy/kata-deploy/base/kata-deploy-stable.yaml
$ kubectl -n kube-system wait --timeout=10m --for=condition=Ready -l name=kata-deploy pod
$ kubectl apply -f https://raw.githubusercontent.com/kata-containers/kata-containers/main/tools/packaging/kata-deploy/runtimeclasses/kata-runtimeClasses.yaml
And that’s it! Kata Containers is installed on your Kubernetes cluster as DaemonSets. Easy, right?
Deploying a microVM
When Kata Containers is available on your Kubernetes cluster, you can deploy a microVM by specifying a runtime class.
The following manifest shows how to deploy a microVM on top of Kubernetes using cloud-hypervisor as the VMM:
apiVersion: apps/v1
kind: Deployment
metadata:
  labels:
    run: php-apache-kata-clh
  name: php-apache-kata-clh
spec:
  replicas: 1
  selector:
    matchLabels:
      run: php-apache-kata-clh
  template:
    metadata:
      labels:
        run: php-apache-kata-clh
    spec:
      runtimeClassName: kata-clh
      containers:
        - image: k8s.gcr.io/hpa-example
          imagePullPolicy: Always
          name: php-apache
          ports:
            - containerPort: 80
              protocol: TCP
          resources:
            requests:
              cpu: 200m
      restartPolicy: Always
---
apiVersion: v1
kind: Service
metadata:
  name: php-apache-kata-clh
spec:
  ports:
    - port: 80
      protocol: TCP
      targetPort: 80
  selector:
    run: php-apache-kata-clh
  sessionAffinity: None
  type: ClusterIP
As you can see, we have specified the runtime class kata-clh in the pod manifest. This will tell the kubelet to use the Kata Containers runtime to run the microVM using cloud-hypervisor as VMM.
If you want to know more about the provided Kata Containers runtime classes, you can read the Kata Containers documentation.
Testing the microVM
Now that the microVM is deployed, we can test it.
We will use the kubectl port-forward command to forward the port 80 of the microVM to port 80 of the host:
$ kubectl port-forward service/php-apache-kata-clh 80:80
If everything is working, you should see be able to connect to the microVM using your browser by going to http://localhost:80/.
Conclusion
In this article, we have seen how to deploy a microVM on top of Kubernetes. We have seen that Kata Containers is a great solution for running a microVM on top of Kubernetes. We have also seen how to deploy a microVM using Kata Containers and cloud-hypervisor as VMM.